Introduction
As homeowners increasingly turn to renewable energy solutions, the prospect of installing solar panels on tile roofs becomes an exciting opportunity to enhance both energy efficiency and sustainability. However, navigating the installation process can feel daunting without the right guidance.
This article offers a comprehensive overview of essential steps, best practices, and safety precautions to ensure a successful solar panel installation on tile roofs. From assessing your roof’s condition to understanding your energy needs and maintaining your system post-installation, each step is designed to empower homeowners with the knowledge they need to make informed decisions.
Embracing solar technology not only contributes to significant cost savings but also supports a healthier planet—making now the perfect time to embark on this rewarding journey.
Essential Steps for Installing Solar Panels on Tile Roofs
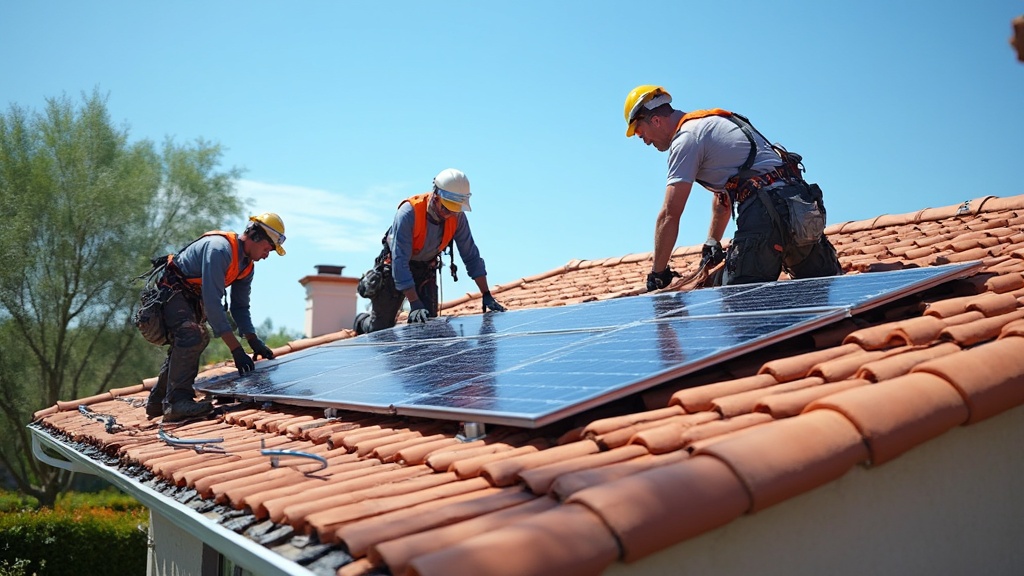
Installing solar panels on tile roof as part of setting up photovoltaic systems on ceramic coverings is an intriguing project that demands some preparation and attention. Here’s a friendly, step-by-step guide to help you navigate this process:
-
Evaluate Your Roof: Begin by examining your ceramic roof to ensure it’s in good condition and can support the weight of solar structures.
Look for any damaged pieces that may need fixing before you proceed.
-
Determine Your Energy Needs: Understanding your home’s energy consumption is crucial. Calculate your monthly electricity usage to determine the number of solar units and battery storage needed for optimal efficiency.
-
Select the Appropriate Solar Modules: Investigate solar systems that are effective for installing solar panels on tile roof surfaces, taking into account efficiency ratings, warranty choices, and visual appeal. Selecting quality products will enhance energy independence and contribute to long-term savings. Solar devices function by transforming sunlight into electricity via photovoltaic cells, which can greatly decrease your utility expenses and encourage sustainability.
-
Gather Necessary Tools and Permits: Before you dive in, make sure you have all the required permits from your local authorities. You’ll also want to gather your tools, which might include a drill, mounting brackets, and safety gear.
-
Installing solar panels on tile roof requires you to first mark where the mounting brackets will be positioned on your structure.
Ensure they line up with the rafters for solid support. Drill holes and securely fasten those brackets down when installing solar panels on tile roof.
-
Attach Solar Collectors: With the brackets prepared, gently raise your collectors onto the roof while installing solar panels on tile roof, and secure them.
Make sure they’re aligned properly to optimize performance.
-
Connect Wiring: Follow the manufacturer’s guidelines to link the wiring from your photovoltaic modules to the inverter and your home’s electrical system. Consider investing in a high-quality inverter to enhance system efficiency.
-
Regular Maintenance: After installation, remember that regular maintenance is key to ensuring your panels operate efficiently. Innovative cleaning solutions, such as biodegradable soaps and specialized brushes, can help keep them in peak condition.
-
Final Inspection: Finally, conduct a thorough inspection to confirm that everything is securely installed and functioning correctly before you flip the switch on your new energy system.
When considering batteries for energy storage, options like the Tesla Powerwall, LG Chem RESU, and Sonnen Eco are excellent choices. These batteries offer numerous features including high capacity, extended lifespan, and efficiency, assisting in optimizing the advantages of your energy system.
With the energy sector anticipated to increase its installed capacity by an impressive 236 GWdc by 2028, now is the ideal moment to contemplate how energy panels can enhance your residence. Advancements in photovoltaic technology and decreasing expenses are improving consumer approval of panel coverings, rendering them a more appealing choice than ever. Moreover, the future potential of the photovoltaic panel market seems bright, fueled by consumer interest and technological advancements, creating a favorable time for homeowners to invest in renewable energy options.
Techniques and Best Practices for Tile Roof Installations
When installing solar panels on ceramic surfaces, keeping a few essential techniques and best practices in mind can make all the difference:
- Use Material-Specific Mounting Systems: Selecting mounting systems designed for roofing ensures they fit securely, minimizing any risk of damaging your beautiful materials. Brian, the President and founder of EcoFasten & Alpine, emphasizes, > Whether your next installation on ceramic is your first or your hundredth, we hope these tips come in handy and serve you well. Proper mounting systems are crucial as they must withstand wind, snow, and seismic loads while providing adequate ventilation and drainage, enhancing the efficiency of your solar heating solution.
- Avoid Walking on Surfaces: Try to limit foot traffic on the surfaces to prevent cracks or damage. Instead, use ladders and scaffolding to safely access the roof.
- Seal Penetrations: When drilling for mounting brackets, applying a high-quality sealant is crucial to prevent leaks and safeguard your structure from potential water damage. The TRI recommends ensuring a proper seal at both the deck and tile level, which is essential for maintaining a leak-free system.
- Consider Aesthetics: Position your energy collectors thoughtfully to complement the roof’s design. This not only enhances curb appeal but may also align with any homeowners’ association guidelines, making the transition to renewable energy more appealing.
- Regular Maintenance: Arrange maintenance inspections to clean your surfaces and examine any potential issues. Keeping everything in tip-top shape ensures your system performs optimally over time, maximizing the economic benefits of reduced utility bills.
- Consult with Professionals: If you have any doubts about the installation process, don’t hesitate to reach out to a professional. This can save you from costly mistakes and ensure you’re complying with local regulations.
- Learn from Case Studies: For example, ballasted energy systems offer versatility without requiring anchorage, but effective design is essential for stability. This approach facilitates wider adoption of photovoltaic panels across various building types.
- Understand Economic Benefits: By integrating sunlight heaters with heat exchangers, homeowners can further enhance their heating efficiency, leading to significant reductions in utility bills. This combination not only supports immediate energy needs but also aligns with long-term sustainability goals.
By following these best practices, you’re setting the stage for a successful and leak-free installation that can stand the test of time, contributing to a sustainable lifestyle and reinforcing the economic advantages of renewable heating. Adopting renewable energy technology is not just about energy savings; it’s a step towards a healthier planet. Start your journey towards sustainable energy today!
Safety Precautions During Installation
Ensuring a safe installation process is paramount when installing solar panels on tile roof, especially as homeowners look to harness the economic and environmental benefits of renewable energy. Here are several key precautions to keep in mind:
-
Wear Safety Gear: Equip yourself with a hard hat, gloves, and non-slip shoes.
These items are essential for protecting against potential hazards that may arise during installation.
-
Use Proper Ladders: Stability is crucial. Make sure your ladder is secure and positioned at the right angle.
Consider using ladder stabilizers to prevent any slipping.
-
Work with a Partner: If possible, enlist help from a friend or family member during the installation.
They can assist with lifting and provide crucial support in case of emergencies.
-
Check Weather Conditions: Always keep an eye on the weather. Avoid installing on rainy or windy days, as slippery surfaces can dramatically increase the risk of falls.
-
Disconnect Power: Prior to working on any electrical components, be sure to disconnect power to the system.
This simple step can prevent dangerous electrical shocks.
-
Follow Local Safety Regulations: Familiarize yourself with and adhere to local safety codes and regulations.
Adherence guarantees not only your safety but also that of others involved in the installation.
As the acceptance of heating technologies increases, recent statistics show a troubling trend: as of July this year, there have been 66 documented instances of photovoltaic fires, exceeding the 63 cases reported during all of 2019. This highlights the urgent need for diligent safety practices. In New Zealand, for instance, scaffolding barriers are required for roofing tasks, which encompass installing solar panels on tile roof.
This regulation has significantly reduced the injury and death toll, demonstrating that implementing such safety measures can make a substantial difference.
Furthermore, the ongoing discussion regarding whether new house builds are safer than photovoltaic retrofits emphasizes the importance of adhering to safety standards during installation. In addition to these safety measures, it is crucial to consider the types of heating systems available.
Active systems provide consistent heating through advanced technology, while passive systems utilize natural design elements to capture and retain heat, offering a more straightforward and cost-effective installation. Integrating thermal heaters with heat exchangers can further enhance home heating efficiency, maximizing energy savings and reducing reliance on traditional energy sources.
By following these precautions and considering the benefits of various heating solutions, you can contribute to a safer installation process, protecting yourself and your home while also embracing the advantages of renewable energy.
Post-Installation Checklist
After the excitement of installing solar panels on tile roof, it’s essential to follow a thorough post-installation checklist to ensure everything is functioning optimally. Solar panels work by converting sunlight into electricity through photovoltaic cells, which generate direct current (DC) that is then converted to alternating current (AC) for use in your home. With photovoltaic installations anticipated to remain stable at approximately 40-45 GW each year for the next five years, ensuring your system functions efficiently is vital.
Here’s a friendly guide to help you through the process:
- Inspect All Connections: Start by checking that all wiring connections are secure and well insulated. This step is crucial for preventing any electrical issues down the line.
- Test the System: Power on your energy system and carefully monitor its performance. Confirm that it’s generating energy as expected—this is a key moment to ensure your investment, which averages an installation cost of $2.62 per watt after tax credits, is working for you!
- Check for Leaks: Take a good look at your roof, especially around the mounting brackets and sealant areas, for any signs of water leaks that may occur when installing solar panels on tile roof. Early detection can save you from bigger problems later.
- Document Installation: Capture photos of your installation and keep an organized record of permits and warranties. This documentation will be invaluable for future reference or if any questions arise.
- Educate Yourself on System Use: Get acquainted with how to monitor your system’s performance and understand its maintenance requirements. Knowledge is power, and it will assist you in maximizing your energy investment.
- Schedule Maintenance: Plan for regular maintenance checks—ideally twice a year—to ensure your energy collectors continue to perform at their best. Regular upkeep will extend the life of your system and enhance its efficiency. Remember, environmental factors such as snow and wind can influence energy performance, so being proactive is key.
- Explore Battery Storage Options: Consider integrating an efficient energy storage battery to store excess energy generated by your panels. Options like the Tesla Powerwall or LG Chem RESU are popular choices that can enhance your energy independence and ensure you have power available even during outages.
By taking these steps, you can enjoy the benefits of installing solar panels on tile roof for years to come, contributing to a greener future. Keeping an eye on your system post-installation not only safeguards your investment but also helps you stay informed about its performance, making it a smart choice for eco-conscious homeowners.
Conclusion
Installing solar panels on tile roofs is an exciting step toward sustainability and energy independence. By assessing your roof’s condition, determining your energy needs, and choosing the right equipment, homeowners can set the stage for a successful installation. Following essential techniques and best practices, such as using tile-specific mounting systems and ensuring proper sealing, can help protect your investment and enhance your home’s curb appeal.
Safety is paramount during the installation process. Wearing appropriate safety gear, using secure ladders, and adhering to local regulations can prevent accidents and ensure a smooth installation experience. Once the panels are in place, conducting a thorough post-installation checklist will help confirm that everything is functioning optimally and that your system is ready to deliver clean energy for years to come.
Embracing solar technology is not just about reducing utility bills; it’s about making a positive impact on the environment. With the solar industry growing rapidly and innovations making the technology more accessible, now is the perfect time for homeowners to invest in solar energy solutions. By taking these steps, you can contribute to a more sustainable future while enjoying the many benefits of solar power.